
Save 10–20 Hours: Matte vs Gloss Finish for Life Size Figures
Matte wins for anything handled often, shown under mixed lighting, or covered in skin and fabric textures, because it hides fingerprints and reads well from any angle. Gloss wins for armor, visors, and metallic surfaces meant for controlled studio lighting, where sharp highlights sell the illusion. Satin splits the difference for display pieces that travel between environments. None of that matters, though, without the right sanding, priming, and clear coat behind it.
TL;DR:
- Gloss surfaces highlight micro-scratches, fingerprints, and dust, making them less suitable for handling-heavy or display-only items.
- Matte finishes hide flaws and glare, improving durability and appearance for cosplay props that are frequently touched or handled.
- Achieving the desired sheen requires post-processing steps like sanding, priming, and multiple clear coats, which can significantly increase production time.
- The final sheen depends more on the finishing process and coatings rather than filament type or color, so testing samples before full production is critical.
- Use higher gloss levels for armor and metallic surfaces and matte for fabrics and organic textures, adjusting finish based on lighting, viewing distance, and handling.
Table of Contents
- Matte vs Gloss Finish: What Each Sheen Actually Does
- How Sheen Changes Color, Contrast, and Photos
- Which Finish Holds Up Better to Handling and Dust?
- How to Choose the Right Sheen for Your Piece
- The Finishing Steps That Actually Set the Sheen
- Why We Push Buyers Toward Sampling Before Committing
- Get Your Finish Right Before Production Starts
- Sources
- FAQ
Matte vs Gloss Finish: What Each Sheen Actually Does
The difference between matte, satin, and gloss comes down to how light bounces off a surface. Gloss surfaces are smooth enough that light reflects at a consistent angle, producing sharp, mirror-like highlights called specular reflection. Matte surfaces are microscopically rough, so light scatters in every direction, called diffuse reflection, which is why matte reads as flat and even instead of shiny. Satin sits between the two, smoothing out some of that microtexture without fully polishing it, so you get a soft sheen without hard glare spots.
This isn’t just about the paint or clear coat. Filament choice plays into it too. Matte and glossy PLA vary in how their surfaces are structured at a microscopic level, and that structure changes how a print looks before any paint touches it, according to testing from FilamentCompare. Glossy filament tends to sharpen edge contrast and make layer lines more visible, while matte filament blurs them into a softer, more forgiving surface.
For large props, that visibility of layer lines matters more than it does on a desk-sized figure, because a life-size piece gets viewed at close range and from steep angles.
- Gloss amplifies every printing artifact, from layer lines to sanding marks.
- Matte hides the same flaws, which is why it’s the more forgiving choice on big flat panels like torsos or capes.
- Satin hides moderate flaws while still giving surfaces some visual depth.
How Sheen Changes Color, Contrast, and Photos
Gloss makes colors look more saturated and creates the kind of crisp highlight that reads as “polished metal” or “wet surface” in photos. That’s exactly why gloss suits armor plating, helmet visors, and weapon props. The catch: gloss is brutal under uncontrolled lighting. A convention hall with fluorescent panels or a living room with a single overhead bulb will throw hot spots and blown-out glare right where you don’t want them.
Matte does the opposite. It kills glare entirely, which keeps the silhouette and detail readable in photos taken under almost any lighting condition, indoors or out. That’s part of why matte PLA is the frequent choice for cosplay props meant to look convincing in photos taken at conventions rather than in a studio, according to testing from MakerBuildIt. Satin lands in between: it tames the worst glare spikes while still giving painted surfaces some visible depth and color richness.
If your figure mixes finishes, like a matte body with a glossy visor, plan the transition line carefully. A hard seam between sheens reads as a mistake unless it follows an actual material break, like a helmet edge or armor seam.
Pro Tip: Shoot a test photo of your piece under the exact lighting it will live in before committing to a full gloss clear coat. A finish that looks stunning under studio softboxes can look harsh and distracting under a shop light or convention hall LED panel.
Which Finish Holds Up Better to Handling and Dust?
Gloss shows everything. Fingerprints, dust, micro-scratches from a stray keychain or careless hand all sit visibly on a glossy surface because the smooth reflection makes any disruption stand out. Matte does the opposite job: its scattered light pattern camouflages fingerprints, light scuffs, and the kind of dust film that settles on a display shelf over a few weeks.
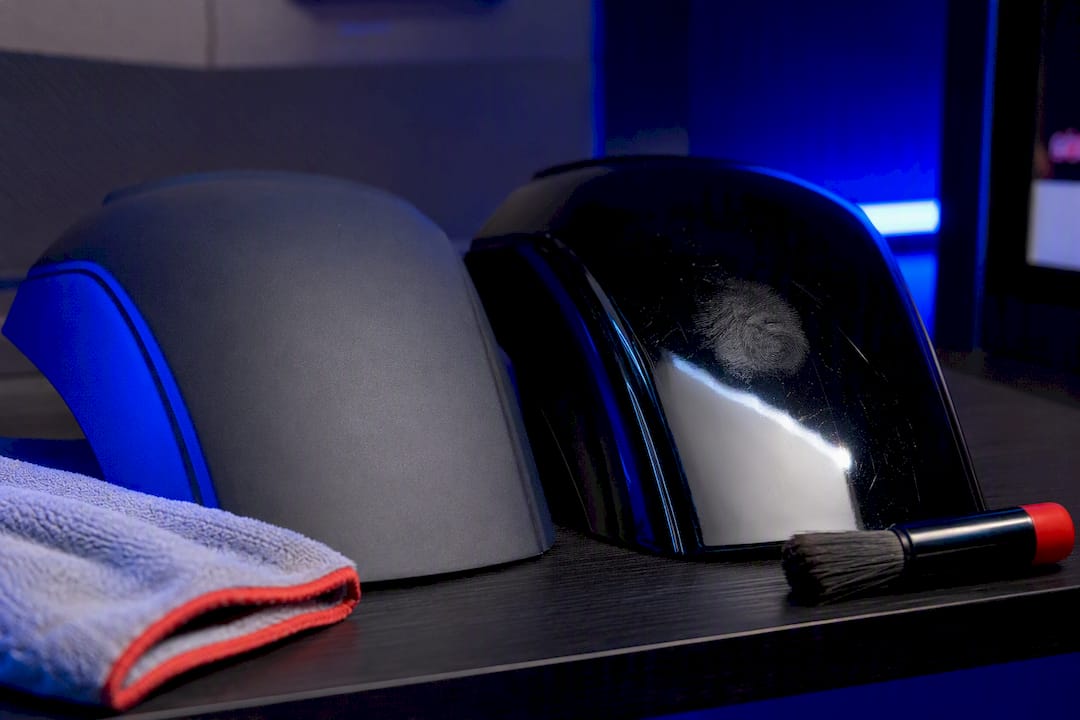
That makes matte the practical pick for cosplay props that get passed around, worn, or bumped into doorframes at a convention. Gloss is better reserved for pieces kept behind glass or on a shelf where hands rarely touch them.
Cleaning routines differ too:
- Wipe matte and satin surfaces with a barely damp microfiber cloth and mild soap; avoid soaking any painted piece.
- Skip solvent-based cleaners on lacquer clear coats, since they can cloud or soften the finish.
- Polyurethane and epoxy clear coats hold up to more abrasion and UV exposure over time than lacquer, which matters if the piece sits near a window or under strong display lighting.
- Reserve any polishing compound for gloss coats only; rubbing compound on matte or satin will burnish shiny patches into the surface.
How to Choose the Right Sheen for Your Piece
Four things decide the right sheen: how far away people will stand from it, how much control you have over lighting, how often hands will touch it, and what the piece actually represents.
- Viewing distance. Close-up display pieces punish gloss for every flaw; matte forgives more at arm’s length.
- Lighting control. Studio or gallery lighting rewards gloss; unpredictable convention or living-room lighting favors matte or satin.
- Handling frequency. Anything worn, carried, or passed around should skew matte for grime resistance.
- Subject matter. Skin, fabric, and organic textures look right in matte; metal, chrome, and polished armor need gloss to sell the illusion.
As a starting rule: skin and fabric areas go matte, armor and visors go gloss, and bases, logos, or nameplates land on satin or gloss depending on how much pop you want them to have next to the rest of the piece.
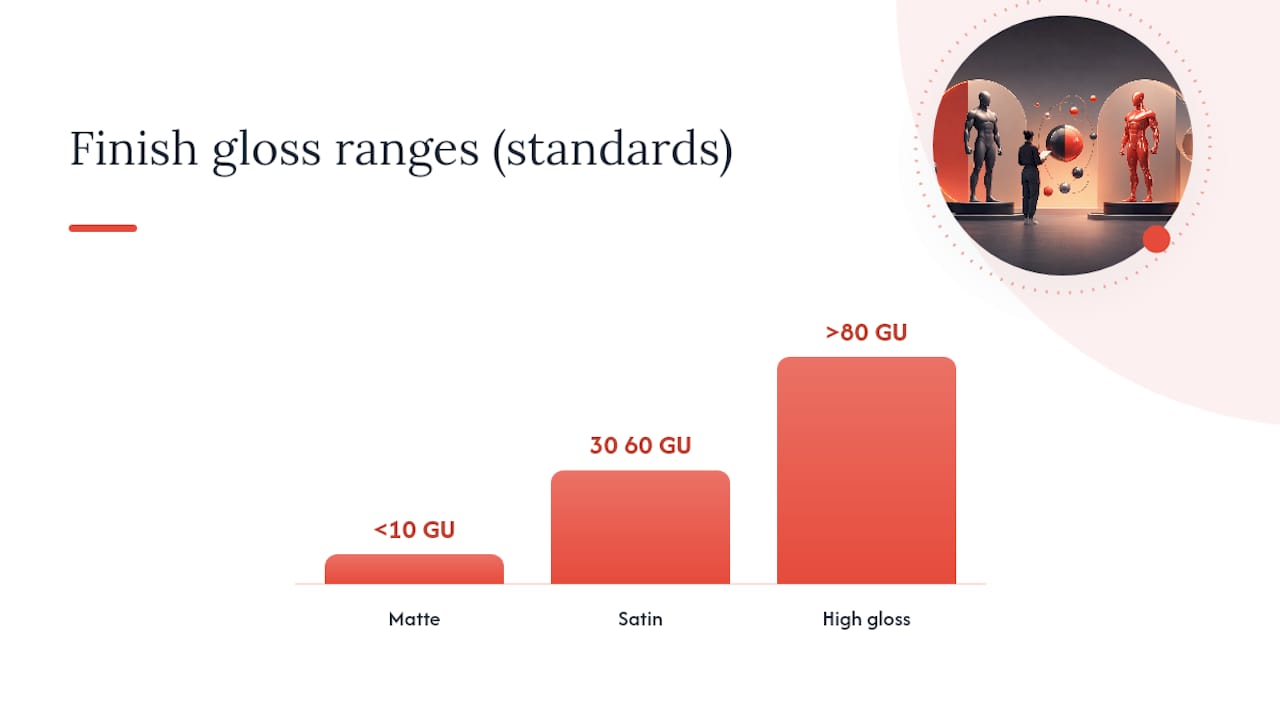
When you’re briefing a finisher or vendor, don’t just say “matte” or “gloss.” Gloss is measured in Gloss Units (GU) using ISO 2813 or ASTM D523 standards, and a specific range communicates far more than a vague label. A true matte coat typically reads under 10 GU, satin lands roughly in the 30 to 60 GU range, and high gloss pushes past 80 GU. Requesting a physical sample chip at your target GU range before committing to a full production run avoids the most common finish disappointment: getting a piece back “shinier than I expected” or “flatter than the reference photo.”
The Finishing Steps That Actually Set the Sheen
The sheen you get has less to do with which filament you printed on and more to do with the six or seven steps that happen after the print finishes. Skipping any one of them is the fastest way to end up with a patchy, inconsistent surface no matter what you ordered.
- Inspect the print for surface inconsistency. Variable print speeds create visible vertical fine artifacts (VFAs), which show up as random patches of extra shine or extra flatness across a single surface. PrusaSlicer’s consistent surface finish setting addresses this directly by changing how the printer slows down for small cross-sections, which is one of the more common causes of mismatched sheen across one part, according to Prusa’s own engineering notes.
- Sand through a grit progression, typically starting around 220 grit and working up to 400 or 600 for large flat panels, knocking down layer lines before primer goes on.
- Apply filler primer in two to three light coats, sanding lightly between each to fill remaining texture.
- Paint your base color and let it cure fully before any clear coat touches it.
- Apply your chosen clear coat, typically two to three spray coats in a clean, dust-free space, which is the step that actually locks in matte, satin, or gloss, according to Formlabs’ post-processing guidance.
- Wet-sand between clear coat layers if you’re chasing true high gloss, since this step is what separates a flat-looking “shiny paint” from a genuine mirror finish.
Budget your time accordingly. A show-quality glossy finish on a helmet-sized prop can eat 10 to 20 hours of hand work between sanding, filler coats, and wet-sanding. Matte and satin finishes cut that labor significantly since they forgive the micro-imperfections gloss exposes.
Pro Tip: If you’re on a tight timeline, matte or satin isn’t a compromise. It’s often the smarter production choice for a large piece, since the labor saved on sanding and wet-sanding can go toward better paint detail elsewhere on the figure.
Why We Push Buyers Toward Sampling Before Committing
Working with life-size pop culture figures for years teaches you one thing fast: a customer’s mental image of “gloss” rarely matches what a spray booth produces at scale. Sheen shifts under different lights, at different distances, on different textures. That gap is exactly why Some providers build finish customization and sample approval into the process for finish-critical commissions, rather than leaving buyers to guess from a swatch. If a piece matters enough to display, it matters enough to see a physical sample first.
— Dominick
Get Your Finish Right Before Production Starts
Some companies decide the finish upfront rather than guessing after the paint dries. Rather than choosing generic “matte” or “gloss” checkboxes online, the process works area-by-area, skin matte here, armor gloss there, logo satin for pop, following sanding, priming, and clear coat steps that determine whether a finish holds up on a piece this size.
If you’re commissioning a custom character, mask, or prop and finish quality matters to the final result, request a quote through 3dcurioprints and talk through your area-by-area finish plan before production locks in. For handled pieces or convention props, ask specifically about sample approval so you see the actual sheen before it ships.
Sources
- New in PrusaSlicer: Consistent Surface Finish and Nerfing VFAs
- How to prime and paint 3D prints
- Matte vs Glossy PLA - FilamentCompare
- Show-Finish 3D Prints: Vapor Smoothing and Coatings
FAQ
Is Matte or Gloss Better for Cosplay Props?
Matte is usually the better choice for worn or carried cosplay props because it hides fingerprints, scuffs, and the micro-scratches that come from convention handling. Gloss looks striking in photos but shows every mark almost immediately once a piece leaves the display shelf.
What’s the Difference Between Satin and Semi-Gloss?
Satin and semi-gloss both sit in the middle range, but satin generally reads flatter and softer, while semi-gloss carries more visible highlight. Neither term is standardized the way Gloss Unit measurements are, so requesting a specific GU range avoids confusion when ordering.
Can I Mix Matte and Gloss on the Same Figure?
Yes, and it’s common for armor-over-fabric characters where visors or metal plating go gloss while skin and cloth stay matte. Keep the transition line along an actual material seam so the sheen change looks intentional instead of accidental.
Does Filament Color or Type Change the Final Sheen?
The clear coat determines final sheen far more than the raw filament, since a matte-printed part can still be pushed to full gloss with the right paint and coating sequence. Filament choice mainly affects how much sanding work you’ll need before that clear coat goes on.
Does 3dcurioprints Offer Finish Customization?
Yes, 3dcurioprints supports finish customization across its life-size figures, masks, and props, including sample approval for finish-critical commissions. Current pricing and finish options are available directly on 3dcurioprints’s site.